
You are saving a lot of time if you create your maps step by step. First off finishing the diffuse map (nearly) completely before creating the specular and normal maps. Everytime you change textures/details on your diffuse you have to re-arrange/create the spec and norm maps.
The more detailed you work on your diffuse map, the easier it is to create all other maps. This means, cut nearly every element you want to edit and create an own layer for it. This is a lot of work but it's speeding up working on the map later.
So if you have this done you can create the specular and normal map parts only for your modified elements. After that you can copy your modded stuff over the original maps, so the parts you didn't edit stay untouched.
//EDIT:
I've uploaded a package of my Lex Luthor skin, so you can see how the layers are cutted and coloured. TOOLS NEEDED
- Photoshop (or Gimp)
- Nvidia Texture Tools Plugin (link in the tutorial)
1) Duplicate all layers of the Diff file and merge them into one, just work with this layer
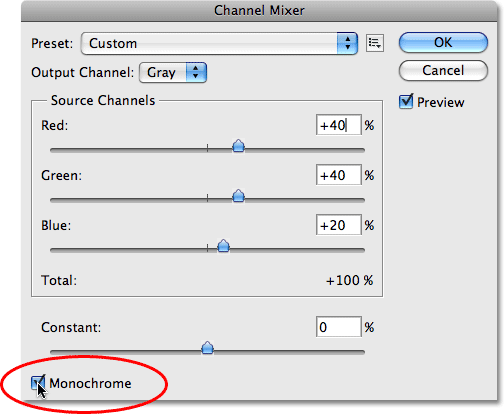
2) Use channel mixer and switch the color to "Monochrome"
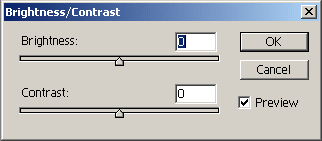
3) Then use Brightness/Contrast with the values "150" for brightness and "100" for contrast
4) Do that step again with the values "100" for brightness and "-50" for contrast
5) It's ready you can copy the edited layer onto the Alpha layer of the Diff file
NORMHQA
1) First set your file size to 1024x1024 px to work proper
2) Duplicate all layers of the Diff file and merge them into one
3) Now copy the merged layer again, so you have 2 copies ready
4) On the bottom layer of these two, you use Nvidia Texture Tools for Photoshop with these settings
Code: Select all
Average RGB | 5x5 (or 3x3) | Scale 10Code: Select all
Average RGB | 7x7 | Scale 107) Merge this two layers
8.) Open Nvidia Texture Tools again and switch from "Average RGB" to "Normalize only"
9) Go to the channels index and copy the "Red layer" to "Alpha 1"
(It's a good step to backup your old Alpha layer by copying it. When you export to DDS format it will always take "Alpha 1" layer for saving. So you can name your backup layer "Alpha 1 Backup" or something like this. It's easier for reverting changes.")
10) Now use the rectangle tool to make your "Red layer" completely white
11) After that use this tool to make the "Blue layer" completely black
12) When saving change the size back to 1024x2048 px
(If your normal map gets too heavy, just delete the blended layer created in step 5. This is optional!)
SPEC
1) Duplicate all layers of the Diff file and merge them into one
2) Use Brightness/Contrast with "10" for brightness and "-20" for contrast
3) Press CTRL+U and adjust "Saturation" to "-10"
ADDITIONAL NOTES
These are just the settings I used for Deadpool. Please consider these settings can vary from character to character. Especially the specular settings. If you work on pure skinned faces you'll probably won't have to brighten it up too much, if it's a mask you can use more brightness for example.

